PHYSICAL THERAPY ROUTINE - 5-15 MINUTES
1st Part - ON THE BACK, with a pillow under the head.


 |
 |
*** 3. Still on the back, with the knees still bent but now sliding the feet even closer to the butt, pick up one foot and put its outer ankle on the other leg's knee. Roll the knee that's in the air slowly toward the ground while trying to keep the back level (having arms splayed outward helps this a lot). Count 30, then bring the knee back up and switch to do the other side. A harder/different version of this is to do the same with the ankle on the knee, but now you grab the hamstring of the planted foot leg and try to bring it toward your chest. Another version is to put your hands on top of your knees to push away as you use your stomach/leg strength to try pull the planted foot leg toward your chest in a resitance exercise. If these are brutal, consider doing instead some easier motions, like heel sliding one foot at a time all the way out and then back before doing the other, or marching your feet by lifting one foot up a ways and replanting it before doing the other.
 |
 |
*** 4. From the same initial position as #3, slowly roll the knees together toward the ground on one side, then the other, like windshield wipers. Try to keep the back level. Do 10 of these.
|
|
 |
*** 5. Also in the same initial position as #3, this time simultaneously allow both knees to fall toward the ground to their sides and then back together again, like a butterfly. Do 10 of these slowly.

 | OR |
 |
*** 7. On the back, with the knees in an open butterly, lift the feet in the air to grab their outsides with the hands and extend the legs/feet upward and hold for a 30 count. This is sometimes called Happy Baby pose.
8. [NO GRAPHIC YET] Something I sometimes do at this point is an exercise for the stomach muscles. An easy one to do while still on the back is to move the legs in the air, like riding a bicycle. The lower the legs are to the floor, the harder this is. A significantly more difficult exercise to do is to place a pillow between your ankles while lying completely flat on the floor and with your arms stretched upward above the head. Swing the outstretched legs and arms slowly into the air toward each other, exchanging the pillow, then bring them down to the ground again still in a long outstretched position. Then repeat this pillow pass in the other direction to make 1 rep complete. Do this 10 times. It's tougher than it sounds...
 | OR |
 |
(***) 9. Moving to where there is a wall corner that is exterior, first use one side of the corner and then the other in lying on your back with one buttcheek placed against the wall to allow its leg to splay flat up the wall as the other leg lies flat on the floor and along the other side of the corner. It may take some time before the leg going up the wall can be flat against it - but that's the object of this position, ultimately. For back injuries, this might be the worst one of all to do of all my stretches/exercises. Take it slow and don't push against pain/nerve freakouts. A balled towel can be placed under the lower spine, if necessary. Hold this position for a 30 count, then twist the ankle 90degrees in one direction for another 30 count before switching to have it twisted in the other direction for another 30 count. Finally, roll the foot at the ankle for 10 reps of clockwise and then counterclockwise circles. Move to the other side of this wall corner to do the other leg similarly. If this is too hard, first try to just have both legs be up the wall in parallel and slowly work toward the legs flattening against the wall before moving on to the one leg up-one leg down position.
2nd Part - On Hands and knees.
 | OR |
 |
*** 1. Start with yoga's Cobra pose: This means first lying on your belly, then planting your palms to the floor with straightened arms and pulling up your torso to look up. The beginner version of this to at first just be on your elbows; the advanced version is to pull/slide just that much more of your chest through your arms. Make sure the back and butt are relaxed. Count 20 or 30. While in belly-to-floor position, another pose you can do is to fully lie on your belly with your calves up and 90degrees to the floor while allowing your calves to splay back and forward like windshield wipers.


 | OR |
 |
*** 5. Here I often do a child's pose, like #5 of the Evening Route.

3rd Part - Still on the floor, a couple of twists
1. In what I call the half-swastika [NO GRAPHIC YET], sit on the floor and flatten first one leg to the floor in an L-shape before doing the same with the other. The two Ls will be at 90degree angles to each other (thus the look from above and the name) while you plant your palms on the ground, one between the legs and one outside while the torso is upright and you look forward. Hold for a 30 count before switching to the other side.
 | OR |
 |
2. This one is called the pigeon pose, where, with your belly toward the ground, you swing one leg up so that it lies on the ground and its calf is perpendicular (as much as is possible) to the torso while the other leg is long in alignment with the body - and whose knee and toe both touch the ground. Place your palms onto the ground above the bent leg and look forward and count 30. Up this pose by doing 10 reps or more, where you lower your face to the ground (kissing it, essentially) before returning to the up position. When in the up position, clench the butt cheek of the leg that is long, releasing it when going down for the floor kiss. Another, easier, version of the pigeon is to do it standing in front of a bed. In this one you bend one leg, placing its calf against the bed's edge while leaning into it and stretching that leg's buttcheek.
OTHER THINGS...
1. Sitting is the source of a lot of back problems, so the less sitting you do in the first place the better. If you are sitting for 45-60 unbroken minutes at a time, a great idea is to get up if only for a moment. Maybe this means (while driving) stopping the car and getting out to just break the sitting pattern. Even if this means doing nothing more than merely standing up, or perhaps walking in a small circle, it helps. Lots of activites we sit for can instead be done lying down, particularly reading, surfing the internet, watching TV/movies... so that's a good habit to adopt. While sitting, meanwhile, you want to feel your weight being fully supported by your sit bones, not from leaning back and using your lower back. Better still, sit a bit forward in a chair while letting one knee drop below the other, sometimes changing which knee is a little down from the other. This lowers back pressure as well.
2. Walking is good for the back, engaging all kinds of muscles in the back naturally. Walk more!
3. A good release for the back is to approach the edge of a sturdy desk/table/counter. There, twist the arms backward so that your palms can grasp the table's edge and support your body's weight as you allow your lower body to go limp (with the tops of the feet dragging on the floor somewhere behind you). This can be something of a relaxing reset for the back while relaxing the lower spine and any built-up pressure there.
POSES FROM MY YOGA ROUTINE - I USUALLY ONLY DO 15-20 MINUTES WORTH
My morning routine uses traditional yoga poses to elongate and twist the body while contributing some more strengthing of the core stomach muscles which are so key to back issues in the long run. What follows is what I'm doing right now, but in the future some of these poses might get swapped with others that work the same areas while adding variety and perhaps more complexity/challenge. One of the key things to me has been to try and keep this to something like a 15min session so that mentally I don't come to dread it as an undertaking. The idea is to keep this daily, short and sweet.


|
| OR |
|
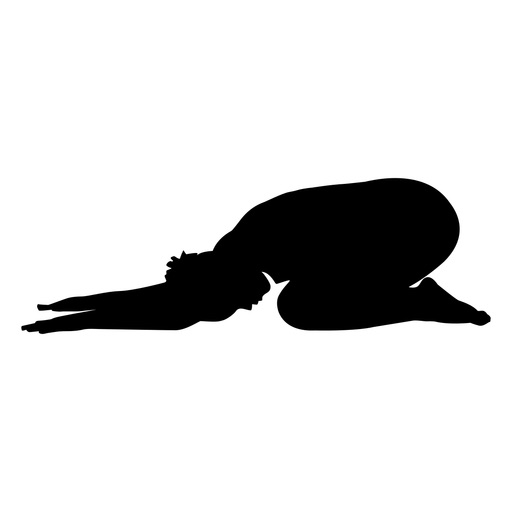
5. Here I do a child's pose on the floor as a brief rest, first getting into a kneeling position, then slightly parting the knees before settling the butt on the heels. I palm-walk or slide my hands on the mat away from the rest of the body until fully extended as the head hangs limply or rests on the floor as I again rotate the shoulders outward as if the shoulder blades are going to touch each other. Alternately, an easier version is to have the arms to the sides limp with the hands resting on the ground past the butt.
 |
 |
6. Planks. I first go briefly into forward plank, or the upper pushup position on hands and toes, then roll to one side to let one inner ankle rest on the other for a side plank. The chest and stomach should face forward as I raise one arm up to the ceiling and turn my head to face its flattened palm. The body should be straight, not sagging. This plank is often seen as difficult and can be worked up to, for example first resting on the forearm instead of the hand or just facing forward and perhaps having the upper hand on the hip with the elbow in the air. Hold for 60 seconds (eventually - it's hard!), then roll through the forward plank to do a side plank on the other side for 60. Then I roll back into a forward plank which I hold for 60. This forward plank I sometimes change a bit and make more demanding, by perhaps alternating legs that I move to a side and then back to the center again 10 times each. Same thing with the arms. Sometimes I do the forward plank before the side planks and eliminate a child's pose.
|
| OR |
|
7. Repeat 5.
 |
 |
 | OR |
 |


 |
 |
11. If I'm in the mood, sometimes I fold up my mat and place it near a wall to do a headstand on it. I do this first with my feet straight up in the air, counting 60, then I let the legs drop away from each other to the sides while "pulling" the leg out through the heel, again counting 60.
No comments:
Post a Comment